
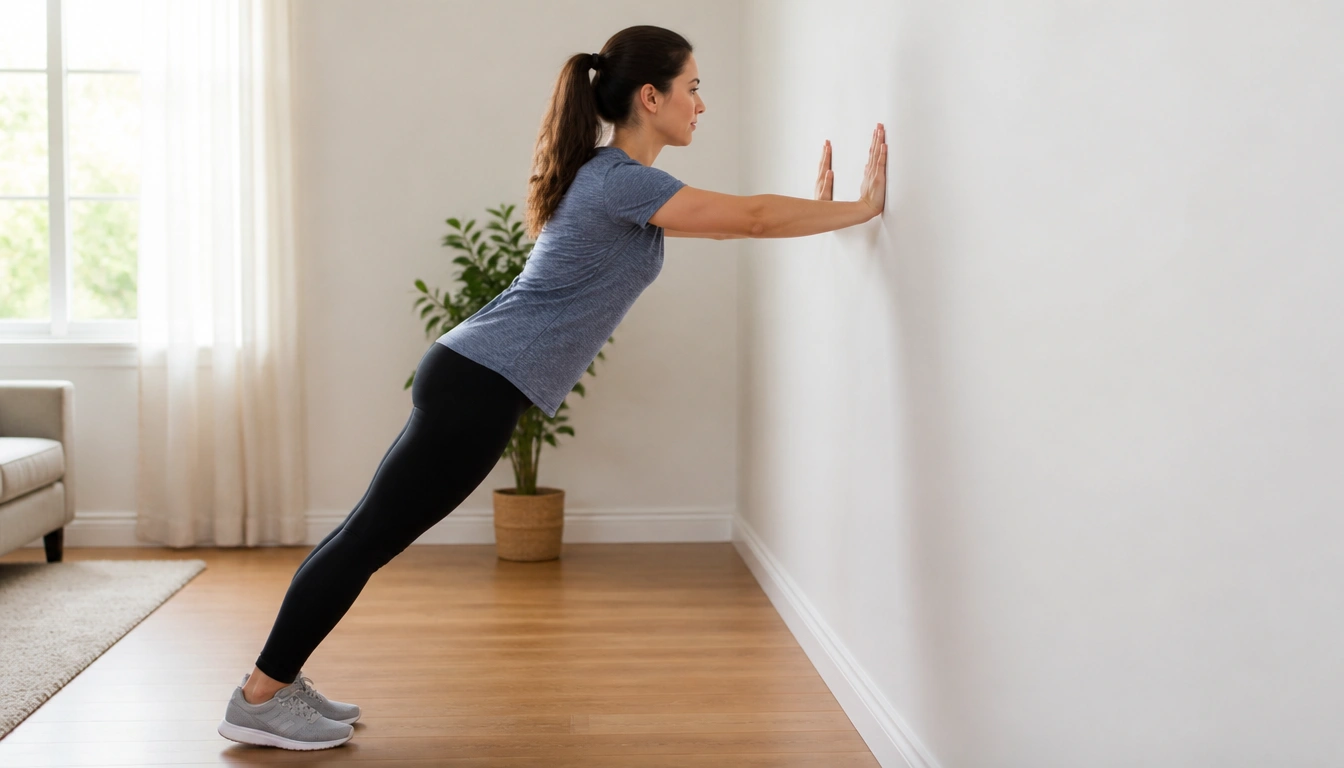
Start with the easiest push-up variation that lets you keep a straight body line and smooth control—often a wall push-up or a high incline for true beginners. From there, progress to lower inclines, kneeling push-ups, negative floor push-ups, and then full push-ups. Move up only when you can repeat the current version with steady form, not when you feel rushed.
Key Takeaways
- A floor push-up can require moving roughly 60–75% of body mass, so many beginners need regressions before they can do one clean rep.
- Lowering the surface lowers the load: wall, incline, kneeling, negative, then full push-up.
- For most beginners, 1 to 3 sets done about 2 days per week is enough to build a base if technique stays clean.
- Progress by control and repetition quality, not by a fixed timeline or a “magic number” of days.
- Mild chest, shoulder, or triceps fatigue is normal; sharp, pinching, or shooting joint pain is not.
- Longer arms or higher body weight can make the early stages harder, so progression should be individualized.
Why the standard floor push-up feels so hard
A full floor push-up is not just “upper-body work.” It is a whole-body bracing drill that asks your chest, shoulders, triceps, and core to move and stabilize a large load at the same time. Biomechanical studies estimate that a standard push-up requires lifting roughly 60–75% of body mass. For an absolute beginner, that can be more than enough to make a first rep feel impossible even if the movement looks simple.
That is also why many beginners stall when they try to “just keep practicing” on the floor. If the load is too high, the body compensates: hips sag, elbows flare, the neck cranes forward, or the movement turns into a half-rep. A regression is not a shortcut or a downgrade. It is the way you make the movement trainable. The American College of Sports Medicine describes progressive overload as the basis of strength gains, and for beginners, reducing the load is often the first smart step toward overload.
Leverage matters too. If you have longer arms, less upper-body experience, or a higher body weight, the same push-up may feel more difficult than it does for someone else. That is normal. The goal is not to match another person’s speed; it is to build enough strength and control to own each stage before moving on.
Why lowering the angle makes the movement doable
The easiest push-up variation is the one that lets you keep the same movement pattern while reducing how much of your body weight you must press. When your hands are higher than your feet, gravity works through a friendlier angle, so the chest and arms manage less load. The lower the surface, the more body weight you must support.
That gives you a simple hierarchy: wall to incline to kneeling to negative to full push-up. Each step down the ladder makes the exercise more demanding. This is why a wall push-up can feel easy enough to learn the pattern, while a floor push-up may still be too heavy for the same beginner.
Think of the progression as a blend of strength and skill. You are not only building muscle; you are teaching your body to brace, lower under control, and press in a coordinated way. As the angle gets lower, the demand on the chest, triceps, shoulders, and core rises. The right stage is the one where you can keep the movement smooth enough to practice well.
How to choose your starting level and move through each stage
If you cannot do one full push-up yet, start at the first variation that lets you keep a rigid body line and complete several controlled reps. Many true beginners should begin with a wall push-up. If that feels too easy and stable, move to an incline surface such as a sturdy counter, bench, or other secure support. If a wall push-up already feels too difficult or your form breaks down, stay there longer before progressing.
Wall push-ups: Stand arm’s length from a wall with hands about shoulder-width apart. Keep your body straight from head to heels. Bend the elbows and bring your chest toward the wall, then press away. Use this stage to learn the path of the movement and to keep the shoulders from shrugging up toward the ears.
Incline push-ups: Place your hands on a stable elevated surface. The higher the surface, the easier the rep; the lower the surface, the harder it becomes. Keep your ribs from flaring and avoid letting your hips sag. This stage often becomes the main workhorse for beginners because it allows real loading without forcing a full floor position too soon.
Kneeling push-ups: Kneel on a mat and place your hands slightly wider than shoulder-width on the floor. Your torso should form a diagonal line from head to knees, not an upright tabletop position. This variation is useful if you can control the upper body but still need to reduce the overall load.
Negative push-ups: Start in a full plank on your toes or from the knees if needed, then lower as slowly as you can, aiming for a controlled descent. This teaches the lowering phase of the push-up and can help build the eccentric strength needed for the full movement.
Full push-ups: Once you can lower and press with control in the easier stages, move to the floor version. Hands should be under the shoulders, core tight, glutes engaged, and body moving as one unit. The goal is not a single lucky rep; it is repeatable, clean reps.
Form cues that protect your shoulders, wrists, and core
Good form is what turns push-up practice into useful training instead of random effort. Keep your body in a straight line, brace the midsection, and move at the shoulders and elbows rather than collapsing through the trunk. If your hips dip first, the variation is probably too hard.
For the shoulders, think “long neck, proud chest.” That does not mean arching the back. It means keeping the shoulder blades stable and avoiding a shruggy, pinched position. The elbows usually work better when they angle somewhat back from the torso rather than flaring straight out to the sides.
For the wrists, spread the fingers and press evenly through the whole hand. If floor or incline push-ups bother your wrists, an elevated surface may be more comfortable than the floor, because it reduces the load and may let you find a better hand position. If pain remains, stop and get individualized advice.
For the core, brace as if you are preparing for a gentle push to the stomach. That helps prevent the low back from sagging. A push-up is not only an arm exercise; it is a bracing exercise that depends on your trunk staying organized while the upper body does the work.
How much to do each week
For a true beginner, a small amount of consistent practice beats occasional hard sessions. Public health guidance from the CDC and the World Health Organization supports muscle-strengthening activity at least two days per week, and that is a good starting rhythm for push-up progression.
A practical beginner dose is 1 to 3 sets per session. The exact repetition count depends on the variation you are using and how clean each rep looks. For early stages, stop a set when your form starts to fade rather than chasing a rep target that turns sloppy. A set that looks controlled is more valuable than a longer set that turns into a struggle.
If you want a simple weekly structure, practice the chosen push-up variation on two nonconsecutive days. If recovery is good and the movement still feels crisp, a third light practice day can be added later, but only if it does not leave your shoulders, elbows, or wrists irritated. You are looking for steady improvement across weeks, not exhaustion after one workout.
Beginners often do well with brief sessions that focus on quality. A few smooth sets done regularly will usually beat a long session done once in a while. The point is to repeat a movement often enough that your body learns it, while still recovering between sessions.
When to progress, when to stay put, and how to fix common mistakes
Move to the next stage when you can complete your current version with stable body position, controlled lowering, and a repeatable number of reps for multiple sets. If you are wobbling, shortening the range, or losing the brace on the last few reps, stay where you are a little longer. Progression should be based on control, not on a calendar.
There is no single correct timeline. Some people move from wall push-ups to incline work quickly; others need longer in the wall or incline stage because of body size, arm length, coordination, or previous inactivity. That is not a setback. It is the normal range of individual response.
Common mistakes that slow progress include lowering the hands too quickly to a harder surface, flaring the elbows aggressively, sagging the hips, and using half reps that avoid the hardest part of the movement. Another common issue is treating every session like a test. If you train too hard every time, technique often gets worse instead of better.
If form breaks down, regress immediately. That might mean raising the incline, reducing the number of reps, shortening the set, or returning to wall push-ups for a few sessions. A smarter regression can restore clean practice and often helps you progress faster in the long run.
Joint pain, warning signs, and when to get help
Muscle fatigue feels like work: a warm, tired, burning sensation in the chest, triceps, or shoulders as the set gets harder. That is usually expected during beginner push-up training. Warning-sign pain feels different. Sharp, stabbing, pinching, or shooting pain in the wrist, elbow, or front of the shoulder is not the kind of sensation to push through.
Stop the set if pain changes your movement or makes you protect one side. Do not try to “win” through joint pain. If you have ongoing shoulder, wrist, or elbow symptoms, a recent injury, or pain that returns every time you push, get assessed by a healthcare professional or a qualified physical therapist before continuing.
People with longer arms, higher body weight, or limited wrist comfort may need to spend more time on wall and incline work before the floor version feels safe and realistic. That is not a failure. It is a reminder that the best progression is the one your joints can tolerate and your form can support.
A simple roadmap from zero to one full push-up
Start with the highest version that feels controlled. For many absolute beginners, that means wall push-ups. Once you can perform several clean sets without losing posture, lower the surface to an incline. After that, move to kneeling push-ups if the movement pattern is solid but the floor load is still too high. Then add negative push-ups to build the lowering strength needed for the full version.
A practical roadmap is to spend enough time at each stage to make the movement smooth, then reduce the angle a little more. If a lower stage causes your form to unravel, step back up and build more control there. This is especially helpful for anyone with a higher body weight, less upper-body training history, or longer arms, because those factors can make the floor version significantly more demanding.
Once you can lower slowly from a full plank and maintain a stiff trunk, try a single floor push-up with clean technique. If one rep is there but multiple reps are not, that is still progress. The next goal is to repeat the rep with the same quality, then gradually build from one to several. That is how the progression becomes a real strength base rather than a one-time achievement.
Frequently Asked Questions
How many sets and reps should a true beginner do for push-up progressions?
Start with 1 to 3 sets per session. Reps depend on the variation and your form, but stop before technique breaks down. For wall or incline work, many beginners do best with a moderate rep range that stays smooth and controlled rather than chasing fatigue.
How often should I practice push-up progressions each week?
A good starting point is about 2 days per week, with rest between sessions. That matches general muscle-strengthening guidance and gives your shoulders, elbows, wrists, and core time to recover. Add more only if recovery stays good and your form remains clean.
What form cues matter most for wall, incline, kneeling, and negative push-ups?
Keep a straight line from head to knees or heels, brace your core, and move under control. Avoid sagging hips, shrugging the shoulders, and flaring the elbows hard out to the sides. In negatives, lower slowly rather than dropping fast.
How do I know when I’m ready to move to the next progression?
You are ready when you can complete your current variation with steady posture, full control, and consistent reps across sets. If the last reps are ugly, shortened, or painful, stay at that level longer or make it easier before progressing.
What pain is normal during push-up training, and what warning signs mean I should stop?
Normal effort feels like muscular fatigue or a burning sensation in the working muscles. Stop if you feel sharp, pinching, shooting, or joint-centered pain, especially in the shoulders, elbows, or wrists. Pain that changes your movement is also a reason to stop and reassess.
The Bottom Line
If you cannot do a full push-up yet, start with the easiest version that lets you keep good form, often a wall push-up or a high incline. Then move down the progression only when your reps are controlled and repeatable.
A smart beginner plan is simple: practice about twice per week, use 1 to 3 sets, and progress by quality rather than a fixed timeline. Lower the surface gradually, and use regressions any time form starts to break down.
Muscle fatigue is expected; sharp joint pain is not. If push-ups irritate your wrists, elbows, or shoulders, or if you have a recent injury, get individualized help before pushing forward.
Medical disclaimer
Medical disclaimer: This content is for educational and informational purposes only and is not a substitute for professional medical advice, diagnosis, or treatment. Dietary needs and supplement suitability vary by individual.
Sources
- American College of Sports Medicine (ACSM) — acsm.org. Accessed November 2026.
