
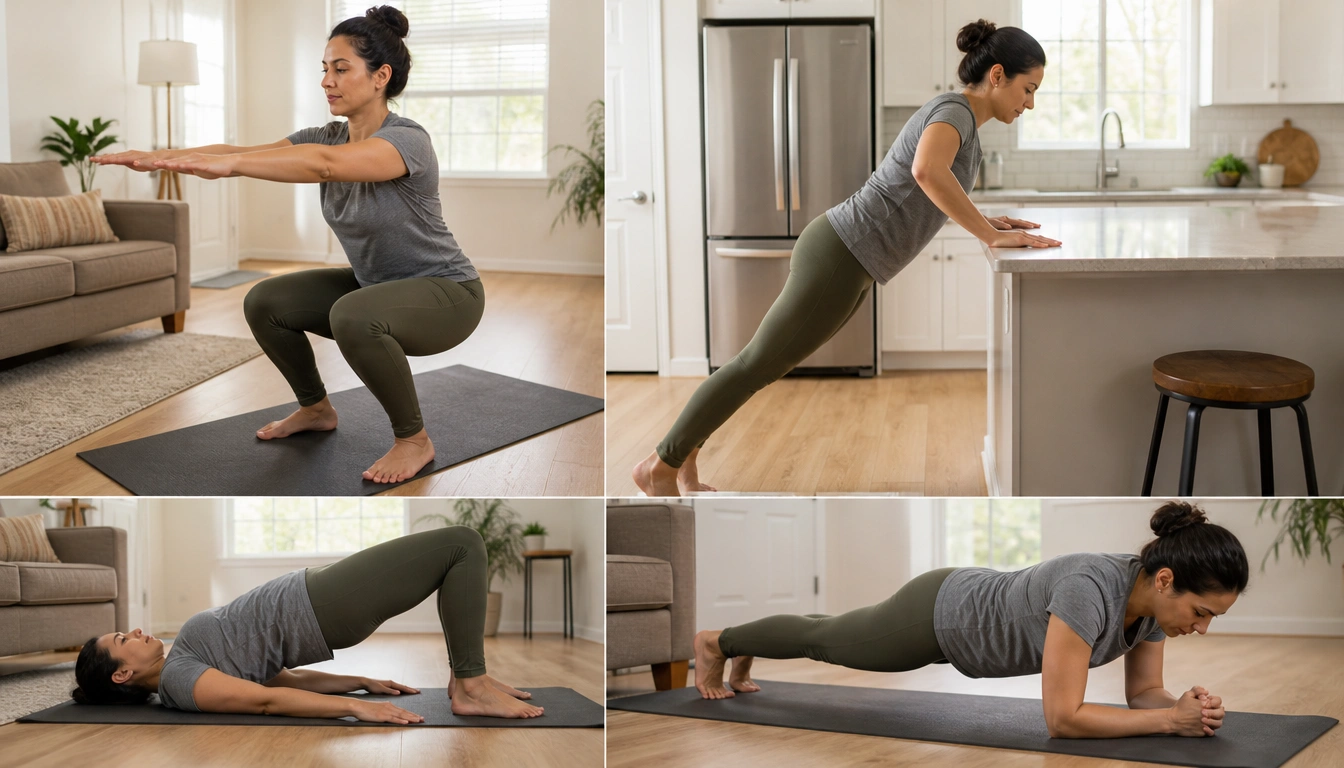
If you are a complete beginner, start with four basics: squat, incline push-up, glute bridge, and forearm plank. Use a slow pace, a stable setup, and a range of motion you can control without pain. Aim for consistency over intensity, and remember that major muscle groups should be trained at least 2 days a week according to public health guidance.
Key Takeaways
- Use bodyweight exercises to build strength at home without equipment, but keep the focus on control, not effort for its own sake.
- For beginners, the safest form check is simple: stable feet or hands, neutral spine, controlled descent, and no sharp pain.
- If a movement feels too hard, regress it first with a wall, countertop, shorter range, or fewer reps rather than forcing full form.
- Older adults and deconditioned readers usually do better with lower volume, extra support, and gradual progress based on consistency.
- Normal fatigue and next-day muscle soreness can happen; sharp pain, dizziness, chest tightness, or shortness of breath are stop signals.
Why bodyweight training is a smart starting point for absolute beginners
Bodyweight training is often the easiest entry point into strength exercise because it removes the two biggest barriers: equipment and complexity. You can practice the same movement patterns you use in daily life, such as standing up from a chair, pushing away from a surface, stabilizing your trunk, and extending your hips. That makes the work practical, not just fitness-focused.
Public health guidance from the Centers for Disease Control and Prevention and the World Health Organization recommends muscle-strengthening activity that works the major muscle groups at least 2 days a week. For a beginner, that does not mean long or intense sessions. It means learning a few reliable movements and repeating them well enough to build a base.
The American College of Sports Medicine also emphasizes that consistency matters more than complexity. A simple routine you can repeat is more useful than a difficult routine you avoid. If you are deconditioned, older, or unsure of your confidence level, bodyweight exercise lets you start with manageable effort and progress in small steps.
How to use this checklist with squats and incline push-ups
The easiest way to think about beginner form is one rule: if a rep looks stable, feels controlled, and does not cause sharp pain, you are probably in the right neighborhood. A little muscle effort is expected. Wobbling, rushing, or forcing depth is usually where form breaks down.
Bodyweight squat checklist
- Stand with feet about shoulder-width apart, with toes forward or slightly turned out.
- Keep your whole foot on the floor: heel, big toe, and little toe stay grounded.
- Start the movement by bending knees and hips together, as if sitting back and down.
- Keep your chest open and torso reasonably upright; do not collapse forward.
- Lower only as far as you can while keeping your back neutral and your heels down.
- On the way up, press through the whole foot and stand tall without leaning back.
Common squat mistakes include knees collapsing inward, heels lifting, rounding the low back at the bottom, and dropping too fast. If your knees cave in, reduce the depth and slow down. If your balance is shaky, hold a countertop or sturdy chair lightly while you learn the pattern. If you cannot keep the heels down, try a smaller squat range until ankle and hip mobility improve.
Incline push-up checklist
- Use a stable surface such as a wall, counter, sturdy table, or couch back.
- Place hands slightly wider than shoulder-width, fingers spread for support.
- Step your feet back so your body forms a straight line from head to heels.
- Brace your abdomen and squeeze your glutes so the low back does not sag.
- Lower your chest toward the surface with elbows angled about 45 degrees from your sides.
- Press back up without losing the straight body line.
This version is often safer for beginners with weak wrists, limited upper-body strength, or shoulder discomfort because the incline reduces how much load you have to move. If a countertop still feels too hard, move to a wall push-up. If a wall push-up feels easy and stable, lower the incline gradually over time. Common mistakes include flared elbows, shrugged shoulders, and a sagging midsection.
How to use this checklist with glute bridges and forearm planks
Glute bridge checklist
- Lie on your back with knees bent and feet flat, about hip-width apart.
- Let your arms rest by your sides, with feet placed close enough that your fingertips can just touch your heels.
- Exhale as you press through your heels and lift your hips.
- At the top, aim for a straight line from knees to shoulders.
- Squeeze the glutes, but do not arch the low back to get higher.
- Lower slowly until your hips lightly touch down before the next rep.
Glute bridges are especially useful for beginners because they teach hip extension without putting much stress on the spine. The most common errors are pushing from the lower back instead of the hips, letting the knees drift outward or inward, and lifting too high until the ribcage flares. If you are unsure, think “ribs down, hips up, glutes on.”
Forearm plank checklist
- Place elbows directly under shoulders.
- Extend the legs back and support your body on your forearms and toes.
- Keep your neck long and gaze slightly ahead of your hands.
- Gently tuck the tailbone and draw the lower belly inward.
- Hold a straight line from head to heels without letting the hips sag.
For beginners, plank quality matters far more than hold time. A short, controlled hold is more useful than a long hold with a dipped back or strained shoulders. If the floor version is too difficult, keep the same shape with knees down. If wrist pressure is an issue, the forearm version is usually more comfortable than a high plank because it removes some wrist extension.
Universal form rules for beginners: tempo, breathing, and quality over quantity
Across all four exercises, use a slow enough pace to notice what your body is doing. A useful rhythm is to lower under control, pause briefly if needed, and rise with control. Fast reps make it harder to see whether your knees, spine, shoulders, or hips are doing what they should. Slower practice is usually safer and easier to learn from.
Breathing matters too. Do not hold your breath through the whole set. Exhale during the hardest part of the movement and inhale as you return. That simple pattern helps keep effort steady and avoids unnecessary tension. If you catch yourself bracing so hard that your face, neck, or shoulders tense up, reset and reduce the intensity.
Quality over quantity is the beginner’s best rule. Five clean reps teach more than fifteen messy ones. Stop the set when your form starts to drift, even if your muscles feel like they could do more. That habit protects joints, builds confidence, and makes progress easier to repeat next week.
How to scale the workout if you are older, deconditioned, or worried about balance
If you are older or have not exercised in a while, start with lower volume and more support. One set of each exercise may be enough at first. Your goal is not to feel exhausted; your goal is to learn the movements and recover well enough to do them again.
Support is not cheating. It is a smart way to make the pattern safe. Use a wall for push-ups, a chair or countertop for balance during squats, and a wall or bed for extra stability when getting into position. If standing balance feels uncertain, practice the squat with a small range and focus on steady foot pressure before lowering deeper.
Progress should be based on consistency, not intensity. You may move from wall push-ups to countertop push-ups, or from a short plank hold to a slightly longer one, only after the current version feels steady for multiple sessions. A gradual rise in control, confidence, and repeatability is a better signal than chasing fatigue.
When soreness is normal vs when pain means stop and get help
Muscle fatigue during a set is normal, and mild soreness the next day or two can also be normal when you are new to training. That soreness usually feels dull, general, and centered in the muscles you worked. It should improve with time, light movement, and ordinary recovery.
What should stop the workout is different: sharp pain, shooting pain, dizziness, chest tightness, or shortness of breath. Pain that gets worse with each rep, changes how you move, or feels clearly joint-based is also a reason to stop and reassess. If a squat hurts your knees, a push-up hurts your wrists or shoulders, or a bridge hurts your back, do not push through it. Change the variation or get evaluated.
If you have a chronic injury, known heart condition, or pain that does not settle with rest, get individualized guidance from a healthcare professional or qualified physical therapist before continuing. The right exercise plan should fit your body, not force it into a template.
How to make the routine stick: habit stacking, two-day weekly minimum, and recovery basics
The best beginner routine is the one you actually repeat. A practical way to do that is habit stacking: attach your workout to something you already do every week. For example, do a short session after you make coffee, after work, or before your evening shower. The routine becomes easier when it lives next to an existing habit.
A useful minimum is two bodyweight strength sessions per week. You can keep them short and still benefit if you stay consistent. Many beginners do well with a few rounds of squats, incline push-ups, glute bridges, and planks, stopping well before form falls apart. Over time, you can add a rep, an extra set, or a slightly harder variation.
Recovery matters as much as the workout. A food-first approach helps: include protein sources such as eggs, beans, fish, tofu, poultry, or dairy, along with carbohydrate-rich foods and steady hydration. You do not need a special supplement plan to begin. You do need enough everyday food and fluids to recover and come back for the next session.
Pregnancy and postpartum note: when to get individualized clearance and possible core modifications
If you are pregnant or recently postpartum, get individualized clearance from your healthcare provider or a specialized physical therapist before starting or resuming core work. Pregnancy and the postpartum period can change joint stability, abdominal pressure management, and how certain positions feel. A movement that is fine for one person may need modification for another.
Planks and other core exercises may need to be changed based on comfort, healing status, and medical guidance. In some cases, a shorter hold, a wall-based version, or a different core drill may be more appropriate than a standard plank. The safest approach is to match exercise choice to your current stage, symptoms, and professional advice rather than assuming one version fits everyone.
If you notice pelvic heaviness, unusual pressure, bleeding, pain, or a sense that core work is making symptoms worse, stop and ask for clinical guidance. Gentle movement can still be part of a healthy routine, but the right version should be personalized.
Frequently Asked Questions
How many days per week should a beginner do bodyweight strength training?
A good starting target is 2 days per week, spaced out so you have time to recover. That matches public health guidance for muscle-strengthening activity and is enough to build consistency without overwhelming a beginner.
How do I know whether my squat or push-up form is safe and correct?
Look for three things: controlled movement, stable alignment, and no sharp pain. In a squat, keep the whole foot down and the knees tracking with the toes. In a push-up, keep a straight line from head to heels and avoid flaring the elbows.
What are the most common beginner mistakes in squats, push-ups, glute bridges, and planks?
The most common mistakes are rushing, losing a neutral spine, letting knees cave inward, sagging the low back, and using more range than control allows. Beginners often also hold their breath or try a harder variation before the easier one feels solid.
How can I modify bodyweight exercises if I’m weak, older, or deconditioned?
Use support and reduce the load. Try wall push-ups, chair-assisted squats, smaller ranges of motion, and knee-down planks or shorter holds. Start with fewer reps or one set, then progress when the current version feels steady and repeatable.
When is muscle soreness normal and when is pain a warning sign?
Mild muscle soreness after a new workout is often normal, especially 24 to 48 hours later. Stop and get help if you feel sharp pain, dizziness, chest tightness, shortness of breath, or pain that clearly worsens during the exercise.
The Bottom Line
For absolute beginners, the safest way to start is with simple movements you can control: squat, incline push-up, glute bridge, and forearm plank. Good form is less about perfection and more about stable positions, steady breathing, and a range of motion that does not cause sharp pain.
Keep the plan small enough to repeat it. Two sessions per week, a slow pace, and a gradual increase in difficulty are enough to build a base. If you are older, deconditioned, pregnant, postpartum, or dealing with joint pain, use more support and get individualized guidance when needed.
Medical disclaimer
Medical disclaimer: This content is for educational and informational purposes only and is not a substitute for professional medical advice, diagnosis, or treatment. Dietary needs and supplement suitability vary by individual.
Sources
- World Health Organization (WHO) — who.int. Accessed November 2026.
- U.S. Government / Health Authority — health.gov. Accessed November 2026.
- National Health Service (NHS) — www.nhs.uk. Accessed November 2026.
- American College of Sports Medicine (ACSM) — acsm.org. Accessed November 2026.
