
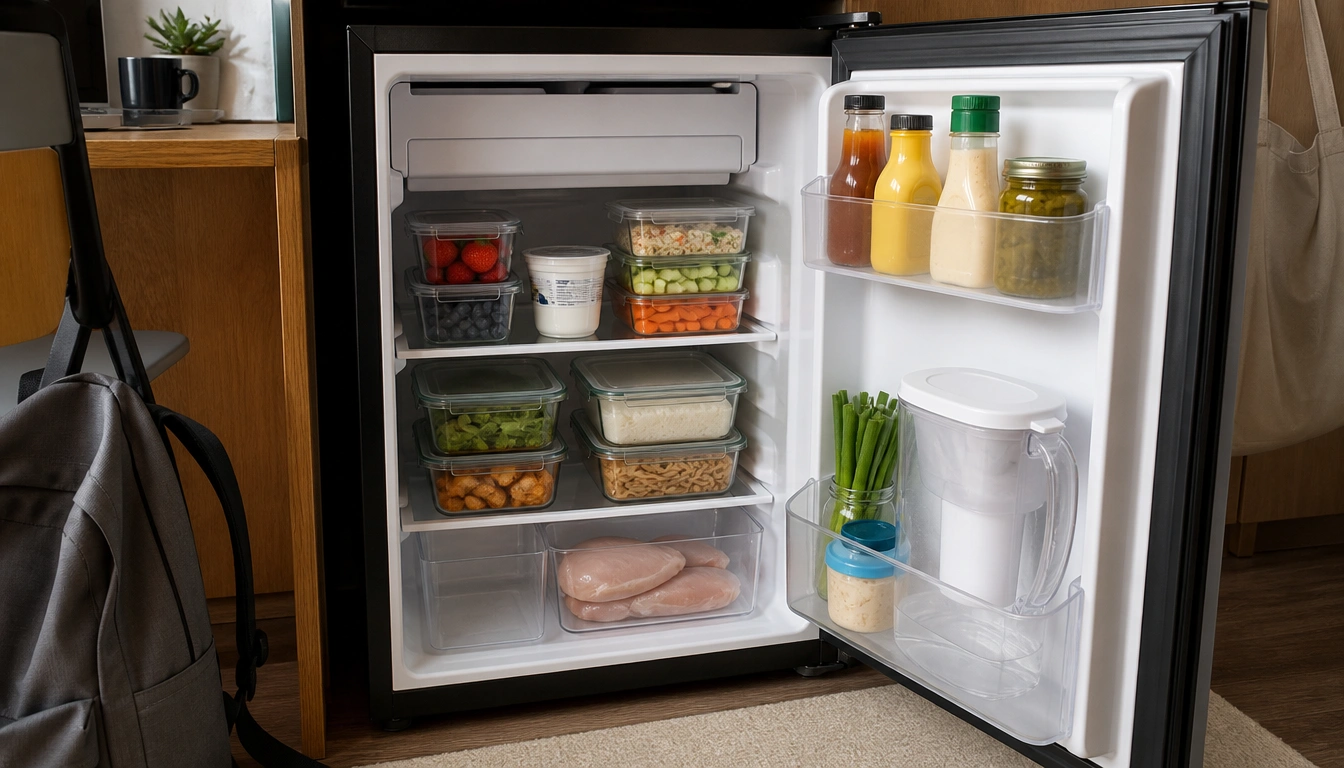
Put ready-to-eat healthy foods at eye level, raw meat on the lowest shelf in sealed containers, and leftovers in a clearly marked "eat me first" zone. Keep the fridge at 40°F or below, use the door only for items that handle temperature swings, and store produce based on ripeness. A simple shelf plan can make healthier choices more visible, protect food safety, and cut waste on a student budget.
Key Takeaways
- Eye-level placement works as a cue: the foods you see first are more likely to get eaten first.
- Use the coldest, most stable areas for raw meat and the safest, most visible areas for leftovers and ready-to-eat foods.
- Mini-fridges need clear bins, less crowding, and space near the back wall so produce does not freeze.
- Some produce belongs on the counter until ripe; putting it in the fridge too early can ruin texture and flavor.
- A small "eat me first" zone helps students use leftovers before they spoil and reduces wasted money.
Dorm and apartment fridge challenges that make healthy eating harder
College fridges are rarely built for easy healthy eating. A mini-fridge in a dorm may be packed with drinks, takeout containers, and half-used sauces. A shared apartment fridge can be worse, with uneven storage habits, mystery containers, and foods pushed to the back until they are forgotten. The result is predictable: the healthiest foods are often the least visible, while convenience snacks sit in the easiest spot to grab.
That matters because many students do not need more willpower; they need a fridge that works with their routines. If a yogurt cup is buried behind a carton of milk, it is easy to skip. If leftover rice or chicken is hidden behind condiments, it may be forgotten until it is no longer safe. A better setup turns the fridge into a small system for convenience, safety, and budget protection.
There is also a food-safety problem. College students may store groceries after a long class day, pack a fridge too tightly, or keep leftovers too long because they are not sure what is still safe. The goal is not perfection. It is making the healthiest food the easiest food to see and the most fragile food the easiest to protect.
Why fridge visibility changes what you eat
Food choice is strongly shaped by visibility and convenience. In behavioral terms, the foods you see first and can reach without effort are more likely to be eaten. That is why the old phrase “out of sight, out of mind” applies so well to a fridge. If fruit is hidden behind leftovers, you will probably forget it. If prewashed grapes or sliced vegetables are front and center, you are more likely to snack on them before reaching for chips or instant noodles.
This is not about willpower or strict discipline. It is about choice architecture, which means arranging your environment so the better choice is the easier choice. A well-organized fridge uses that principle in a very practical way: put nutritious grab-and-go foods where your eyes naturally land, and move less useful items out of the prime spots. The best system is the one you can keep using during busy weeks.
For students, the easiest version is simple. Keep healthy snacks in a clear container at eye level. Put leftovers in a labeled section you check first. Push condiments, extra drinks, and bulky containers to the sides or door. When healthy foods are visible and ready, you remove one of the biggest barriers to eating them.
A shelf-by-shelf fridge plan that supports healthy eating and food safety
Refrigerators are not the same temperature everywhere. The U.S. Food and Drug Administration and the U.S. Department of Agriculture recommend keeping the fridge at 40°F or below, and the coldest, most stable areas are usually the lower and middle shelves, not the door. That means you can organize by both safety and convenience.
Top shelf: Put ready-to-eat foods here, especially items you want to see first. Good options include yogurt, hummus, cut fruit, prewashed vegetables, hard-boiled eggs, and leftovers you plan to eat soon. This spot works well for healthy grab-and-go foods because it is easy to reach and easy to remember.
Middle shelves: Use this area for dairy, meal prep containers, and foods that need steady cold storage but do not carry the same cross-contamination risk as raw meat. Keep healthy staples in clear containers so you can see them quickly.
Bottom shelf: Store raw meat, poultry, and seafood here in sealed containers or leak-proof bags. This is the safest placement because any drips stay below ready-to-eat foods. If you live in a shared apartment, keep this area especially tidy so no one accidentally places produce or leftovers under raw proteins.
Fridge door: Save the door for items that handle temperature changes better, such as condiments, jams, and some beverages. The door warms up every time it opens, so it is not the best place for milk, eggs, or foods that spoil quickly. If space is tight, think of the door as the least stable zone, not the safest one.
If your fridge has only a few shelves, the same logic still applies. Put the most perishable and most visible foods in the most stable cold area, and keep raw protein physically separated from everything ready to eat.
Mini-fridge adaptations plus which produce belongs in the fridge and which should stay out
Mini-fridges need a different strategy because they are small, often unevenly cold, and easy to overpack. Clear stackable bins can help you separate categories without losing visibility. For example, one bin can hold breakfast items, one can hold produce, and one can hold leftovers. Clear bins matter because you can see what is inside without moving everything around.
Do not cram the fridge full. Overpacking blocks airflow, which can create warmer spots and make the back wall too cold. That can lead to produce freezing against the back, especially leafy greens, berries, and cut vegetables. Leave a little space around food so cold air can move. If your mini-fridge runs cold in the back, place delicate produce toward the front or in a bin that keeps it slightly away from the wall.
For produce, timing matters. Some fruits and vegetables should stay out until ripe, then move into the fridge if needed. Bananas, whole tomatoes, avocados, and melons are common examples of foods that are often better on the counter first. Once ripe, some of them can be refrigerated to slow further ripening. By contrast, berries, leafy greens, cut fruit, cut vegetables, and many herbs generally belong in the fridge. If possible, line a container with a paper towel to help manage moisture and reduce sogginess.
Students often waste produce because they store everything the same way. A better habit is to ask two quick questions: Is it ripe yet? And does it spoil faster once cut? That small check can save money and keep the food you bought actually edible when you want it.
Use an eat me first zone to protect your budget
One of the most useful fridge habits for students is creating an “eat me first” zone. This is a small, clearly visible area for leftovers, opened packages, and foods that need to be used soon. It could be one shelf corner, one bin, or one labeled section on the top shelf. The point is to make older food more visible than newer food.
This setup helps with both waste and money. If you check the eat me first zone before shopping or meal planning, you are less likely to buy duplicates and more likely to use what you already have. That can matter a lot on a student budget, where a forgotten container of soup or a half-used carton of berries is not just wasted food; it is wasted cash.
A good habit is to place newer groceries behind or below the older items, while the foods that need attention go in front. If you cook a batch meal, label the container with the day you made it. If you open a package of deli meat, yogurt, or cooked vegetables, move it into the eat me first zone right away. The easier it is to spot, the more likely it is to be eaten before it spoils.
You can also tie this to meal planning. Before heading to the dining hall or grocery store, open the fridge and check that zone first. That quick scan often reveals a snack, a side dish, or a leftover meal you can use immediately.
A fast post-grocery setup that takes less than 10 minutes
The most effective fridge organization happens right after shopping. Once you get home, do a quick reset before putting everything away. Wash produce that is meant to be eaten raw, portion snacks into small containers or bags, and move leftovers into shallow containers so they cool and stay visible. Label anything that will not be eaten right away.
Then stack with intention. Put the most perishable foods where you will see them first. Place produce in a clear bin, leftovers in the eat me first zone, and raw proteins on the bottom shelf. Keep condiments and drinks out of the best shelf space unless they truly need it. The goal is not a perfect pantry photo; it is a layout that helps you eat the food before it goes bad.
If you live in a shared apartment, a quick reset also makes the fridge easier to share. Your food is easier to identify, less likely to be moved around, and less likely to disappear behind someone else’s grocery haul. A visible system saves time later because you are not digging through the fridge every time you want a snack or meal.
Common fridge mistakes students make and how to fix them
One common mistake is using the door for milk or other fragile items because it feels convenient. A better move is to put temperature-sensitive foods on an inside shelf and use the door for condiments or drinks that can handle fluctuation. Another mistake is putting healthy snacks in opaque containers or in the back where they are forgotten. Use clear containers and place them in the first place your eyes naturally land.
Students also often overfill mini-fridges. When the fridge is packed tight, cold air cannot circulate well and food safety suffers. If your fridge is full, reduce duplicate items, move stable foods to a shelf basket, or keep less essential items elsewhere if your housing allows it. Less clutter usually means less waste.
Another common issue is treating all produce the same. Some fruits need time on the counter to ripen; others should be refrigerated right away. If you store everything cold by default, you may ruin texture or cause unnecessary spoilage. Finally, do not rely on smell alone. Some unsafe food looks and smells normal, so use time, temperature, and storage history as your guide.
When to discard food and when to seek medical care
When in doubt, throw it out. If leftovers have sat at room temperature for more than 2 hours, they should be discarded; the limit is 1 hour if the room is hot, such as above 90°F. According to the USDA and FDA, the refrigerator should stay at 40°F or below, and leftover cooked food is generally safest only for a few days in the fridge. If you are unsure how long something has been there, it is safer to let it go than to take a chance.
Discard any food with mold, a damaged seal, obvious spoilage, or a questionable storage history. Do not taste food to test whether it is safe. If raw meat juice leaked onto ready-to-eat food, or if a container was left in a warm bag for too long, throw it away.
Seek medical care if you develop severe vomiting, bloody stools, a high fever, signs of dehydration, dizziness, or trouble keeping fluids down after eating possibly unsafe food. Food poisoning can become serious, especially if symptoms are intense or you cannot stay hydrated. If symptoms are mild, rest and hydration may help, but worsening symptoms deserve professional attention.
Frequently Asked Questions
What foods should go on the top shelf, middle shelf, bottom shelf, and fridge door?
Use the top shelf for ready-to-eat foods and leftovers, the middle shelves for dairy and meal prep, the bottom shelf for raw meat, poultry, and seafood in sealed containers, and the door for condiments and other items that tolerate temperature swings.
How can I organize a mini-fridge in a dorm with very limited space?
Use clear stackable bins, keep only the foods you will eat soon, and avoid overpacking so air can move. Put healthy grab-and-go foods at eye level, and keep raw proteins on the lowest stable shelf away from ready-to-eat items.
Which fruits and vegetables should stay out of the fridge until ripe?
Common examples include bananas, whole tomatoes, avocados, and some melons. Once ripe, some can move to the fridge to slow further ripening. Berries, leafy greens, cut produce, and most herbs usually do better refrigerated.
How do I prevent food spoilage and waste on a student budget?
Create an "eat me first" zone for leftovers and soon-to-expire foods, label containers with dates, and check that zone before shopping. Keeping older food visible helps you use what you already bought before it goes bad.
How long can leftovers safely stay in the fridge before they should be thrown out?
Leftovers are generally safest only for a few days in the fridge, and they should never sit at room temperature for more than 2 hours, or 1 hour in hot conditions. If you are unsure about storage time or temperature, throw them out.
The Bottom Line
A healthy fridge setup for college is mostly about making the right food the easiest food to see. Put ready-to-eat items at eye level, keep raw meat on the bottom shelf, and reserve the door for foods that can handle temperature swings.
For students with tight space, the best system is simple: use clear bins, avoid overpacking, separate produce by ripeness, and keep an "eat me first" zone for leftovers and foods that need attention soon.
That approach supports better eating, reduces waste, and makes food safety easier to manage without adding much time to your week.
Medical disclaimer
Medical disclaimer: This content is for educational and informational purposes only and is not a substitute for professional medical advice, diagnosis, or treatment. Dietary needs and supplement suitability vary by individual.
