
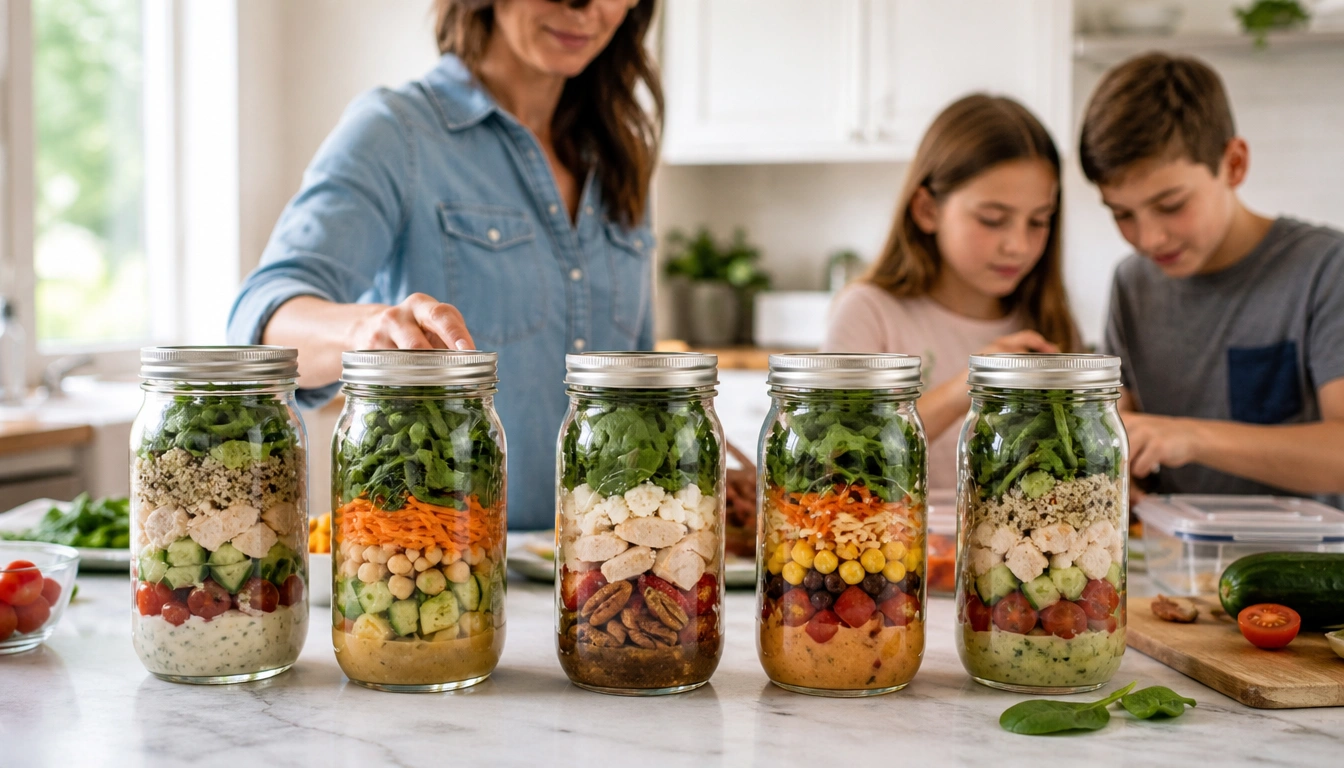
Build salad jars with dressing on the bottom, sturdy vegetables next, then grains, proteins, toppings, and leafy greens on top. Keep them refrigerated at 40°F or below, use plant-based jars within about 3 to 5 days for best quality, and eat jars with chicken, eggs, or seafood within about 3 to 4 days. For busy parents, a Sunday-to-Wednesday prep rhythm is usually easier and safer than making a whole week at once.
Key Takeaways
- Layer dressing first so moisture stays away from the greens until mealtime.
- Use crisp vegetables, beans, and grains as buffer layers that hold up well in the fridge.
- Plant-based jars usually keep their best quality for 3 to 5 days; jars with poultry, eggs, or seafood need a shorter window.
- A midweek refresh is often more practical than prepping seven jars in one session.
- Wide-mouth glass jars are convenient at home, while leak-proof BPA-free plastic can be better for school or commuting.
Why salad jars work for busy parents
Salad jars are useful because they shift the work to a calmer part of the week. Instead of chopping vegetables, cooking grains, and washing greens every afternoon, you do the setup once and then grab a ready-to-eat meal or lunch. That can make it easier to keep a balanced meal in rotation when schedules are crowded.
They also help with freshness. A sealed jar keeps the dressing separated from the greens, so the lettuce does not sit in liquid for hours. That matters for texture, but it also matters for families who need food that still looks and tastes appealing by lunchtime. A good jar can be a practical bridge between convenience and home-prepared food.
For many parents, the real payoff is mental. One prep session can cover several meals, reduce takeout decisions, and make it easier to pack a lunch before school or work without starting from scratch.
The core layering system explained in plain language
The science behind a crisp salad jar is simple: moisture moves. If wet dressing or juicy vegetables touch delicate greens too early, the leaves pull in moisture and lose their structure. That is why the dressing belongs at the bottom and the greens belong at the top. The layers in between act like a buffer.
Start with the dressing first. A vinaigrette or creamy dressing sits safely at the base of the jar, where it cannot seep into the greens too soon. Add the most moisture-tolerant vegetables next, such as carrots, bell peppers, cucumbers, radishes, celery, or whole cherry tomatoes. These ingredients hold up well and create separation between the liquid and the leaves.
After that, add beans or grains if you are using them. Chickpeas, black beans, quinoa, farro, or brown rice add staying power and make the jar more filling. Then add proteins such as chicken, hard-boiled eggs, tofu, tuna, or cheese if that fits your family’s preferences. Put dry toppings like nuts, seeds, or croutons near the top, and finish with leafy greens. Romaine, kale, spinach, or mixed greens work well when they stay dry until serving time.
Think of the jar as a built-in barrier system. The lower layers can handle a little moisture, and the top layer stays protected until the jar is shaken or inverted.
Best ingredient combinations by jar type
The easiest salad jars use ingredients that match the jar’s purpose. For a vegetarian jar, a good combination is vinaigrette, cucumbers, carrots, chickpeas, quinoa, feta, and romaine. That mix gives you crunch, protein, and enough substance to feel like a meal without much effort.
For a protein-forward jar, use dressing, sturdy vegetables, a grain if desired, and a chilled protein such as chicken or eggs. Add a small amount of cheese or seeds for extra flavor. This style works well for adults and older kids who need something more filling after a long day.
Kid-friendly jars often do best with simple, familiar flavors. Try ranch or a mild vinaigrette, then layer sweet peppers, corn, cucumber, shredded carrots, cheese, and chopped lettuce. Some children do better when the ingredients are separated into clear visual bands, because it feels less mysterious than a tossed salad.
Budget-friendly jars can lean on low-cost staples: beans, cabbage, carrots, cucumber, leftover rice or quinoa, and seasonal produce. Cabbage is especially helpful because it stays crisp longer than many tender greens. If your family likes it, add canned beans for protein and a homemade dressing to keep costs down.
One useful rule is to build around what you already have. Leftover roasted vegetables, cooked grains, and extra chicken can all become part of a jar if they are cooled properly before assembly.
Food safety and storage rules parents should not ignore
Food safety matters as much as layering. According to the FDA and USDA, cooked foods should be refrigerated at 40°F or below as soon as possible, and within two hours of cooking. That includes chicken, eggs, seafood, rice, and other cooked ingredients you want to use in a jar later.
Once assembled, keep salad jars cold in the refrigerator until they are ready to leave home. If the jar will travel to school, work, or practice, use an insulated lunch bag with a cold pack. A jar that sits warm in a backpack or car can move into the temperature range where bacteria grow more quickly.
For storage windows, plant-based and grain-heavy salad jars generally keep their best quality for about 3 to 5 days. Jars that contain chicken, eggs, or seafood should be used within about 3 to 4 days. That shorter window is a quality and safety safeguard, not just a texture issue.
High-risk family members, including pregnant people, young children, older adults, and anyone with a weakened immune system, should be especially careful with prepped foods. When in doubt, keep the storage time shorter, make sure produce is washed well, and discard any jar that smells off, looks slimy, or has been held too long.
How to prep for a school or work week without overdoing it
A Sunday-Wednesday split is often the easiest rhythm for families. Instead of making five or seven jars at once, prep enough for the first half of the week, then refresh ingredients midweek. That gives you better texture and reduces the chance that food will sit too long before it is eaten.
A practical plan is to wash and dry greens, chop the sturdier vegetables, cook or portion any grains, and prepare a protein for the first few days. Then assemble Monday through Wednesday jars. On Wednesday evening, restock the fresh items and make another small batch for Thursday and Friday.
This approach also helps you make better use of leftovers. If you have extra roasted vegetables, cooked chicken, or a grain bowl base from dinner, you can fold those into the next round of jars rather than cooking a brand-new set of ingredients.
If time is tight, keep a short list of repeatable jar formulas. For example: Mediterranean-style, taco-style, or classic chicken Caesar-style. Repeating a few combinations makes prep faster without feeling monotonous.
Choosing the right container
Wide-mouth mason jars are popular for a reason. They are easy to fill, easy to empty, and the wide opening makes it simpler to layer ingredients without spilling dressing onto the sides. Pint jars can work for lighter lunches, while quart jars are better when you want a larger meal.
For home use, glass is often the most practical choice because it is sturdy, reusable, and easy to see through. It also helps you check the layers at a glance. Still, glass is not always the best option for school bags, crowded commutes, or situations where breakage is a concern.
In those cases, leak-proof BPA-free plastic containers can be a better fit. They are lighter, less fragile, and often easier for children to carry. What matters most is a tight seal, enough depth for layering, and a lid that will not leak in a lunch box.
If you are packing several meals, choose containers that fit your family’s real routine. A jar that is pretty but awkward to carry will not get used as often as a simpler container that actually works in a backpack or work bag.
How to make salad jars more appealing to kids
Kids are more likely to eat a jar they helped build. Simple choice-making can go a long way: let them pick between two vegetables, choose the cheese, or decide whether they want beans or chicken. Giving small choices keeps the process manageable for parents while making the meal feel personal.
Color helps too. Bright vegetables such as carrots, corn, peppers, cucumbers, and cherry tomatoes make the jar look more inviting. Varying textures can also make the meal more interesting, especially if a child tends to reject salads that feel bland or too leafy.
Assembly can become a family job instead of a parent-only task. Younger children can rinse produce, tear lettuce, or place prepped ingredients into small bowls. Older children can help spoon layers into jars. When kids participate, they often feel more ownership over the meal and are more willing to try it later.
At mealtime, shake the jar gently, then invert it onto a plate or into a bowl. That step helps the dressing spread without making the greens sit in liquid. If a child dislikes a fully dressed salad, keep the toppings separate and let them add a small amount after pouring.
Troubleshooting soggy greens, watery vegetables, and leaking lids
If your greens are soggy, the usual problem is contact with too much moisture. The fix is to move dressing lower, keep greens as dry as possible, and use firmer buffer vegetables between the dressing and the lettuce. Dry the leaves well before layering; a little extra moisture from washing can matter over several days.
Watery tomatoes can also cause trouble. Use whole cherry tomatoes instead of chopped tomatoes when possible, or keep very juicy produce in a smaller side container. Cucumbers can do the same if they are overripe or cut too thin. Choose firmer vegetables for the bottom layers and reserve delicate produce for the top or for last-minute addition.
If protein tastes limp, it may have absorbed too much dressing or sat too long in the jar. Make sure cooked chicken or eggs are fully cooled before assembly, and do not overpack the protein layer with wet ingredients. Some families prefer to keep protein separate and add it after the jar is poured, especially for meals that will not be eaten right away.
Leaking lids are usually a container issue, not a recipe failure. Check that the jar is not overfilled and that the lid seals tightly. For commutes, a leak-proof container is more important than a decorative one. If a jar regularly leaks, replace the lid or switch to a container designed for transport.
When a jar starts to look questionable, it is safer to throw it out than to try to rescue it. Good planning is helpful, but food safety comes first.
Frequently Asked Questions
What ingredients work best in salad jars so they don’t get soggy?
Choose sturdy vegetables and layers that can handle moisture, such as carrots, cucumbers, bell peppers, celery, whole cherry tomatoes, beans, and grains. Keep delicate greens at the top and dry toppings near the lid so they stay crisp until mealtime.
How long can salad jars be stored in the refrigerator safely?
For best quality, plant-based and grain-heavy jars are usually good for about 3 to 5 days, while jars with chicken, eggs, or seafood should be used within about 3 to 4 days. Keep them refrigerated at 40°F or below.
What is the correct order for layering a mason jar salad?
Start with dressing, then add hard vegetables, then grains or beans, then proteins and cheese, then dry toppings, and finish with leafy greens on top. That order keeps moisture away from the greens until the jar is ready to eat.
Can I pack salad jars with chicken, eggs, or beans for lunch?
Yes. Beans are very convenient, and chicken or hard-boiled eggs can work well if they are cooked, cooled quickly, and kept cold. The storage window should be shorter for jars with animal proteins than for plant-based jars.
What are the best container options if I don’t want to use glass jars?
A leak-proof BPA-free plastic container can be a better choice for school bags, work commutes, or anywhere glass would be inconvenient. Look for a tight seal, enough depth for layering, and a lid that will not leak.
The Bottom Line
Salad jars work best when you treat them like a layered system, not a tossed salad in a container. Keep dressing at the bottom, protect the greens at the top, and choose ingredients that stay crisp for a few days.
For busy families, the most realistic approach is often a small batch at the start of the week, then a midweek refresh. That keeps prep manageable, improves texture, and makes it easier to use ingredients before they lose quality.
If you keep the jars cold, choose the right container, and match the ingredients to the storage window, salad jars can be a practical school lunch or dinner backup that actually gets eaten.
Medical disclaimer
Medical disclaimer: This content is for educational and informational purposes only and is not a substitute for professional medical advice, diagnosis, or treatment. Dietary needs and supplement suitability vary by individual.
Sources
- U.S. Government / Health Authority — usda.gov. Accessed November 2026.
- U.S. Food and Drug Administration (FDA) — fda.gov. Accessed November 2026.
- U.S. Government / Health Authority — foodsafety.gov. Accessed November 2026.
- Centers for Disease Control and Prevention (CDC) — cdc.gov. Accessed November 2026.
