
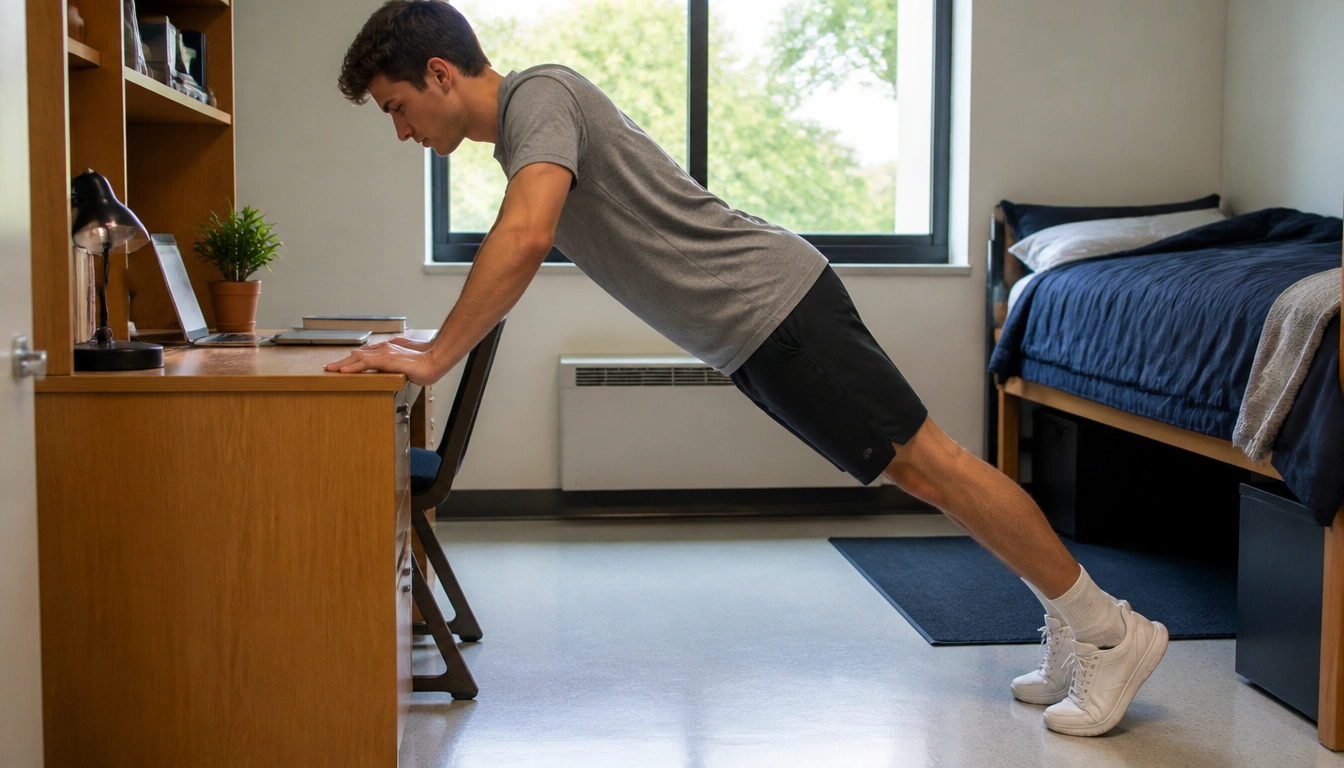
The safest and most realistic way to progress to a standard push-up is to start with the easiest version you can control, practice it consistently, and only advance when you can do 10 to 12 controlled reps with a slow lowering phase and stable body alignment. For many college students, that means moving from wall push-ups to incline push-ups, then to knee or eccentric-only reps, and finally to floor push-ups as strength improves.
Key Takeaways
- Most beginners do not need a gym to build push-up strength; body angle is the main way to scale the exercise.
- Two short practice sessions per week can support progress, and beginners may still improve with 1 to 3 sets taken near fatigue.
- Advance only when you can complete 10 to 12 controlled reps with a 3-second lowering phase and good alignment.
- Wrist discomfort can often be reduced by using an incline, parallettes, dumbbells, or a sturdy elevated surface.
- Longer arms and lower starting upper-body strength can make standard push-ups harder, so your timeline should be individual.
- If your lower back sags during push-ups, brace your core and glutes before increasing difficulty.
Why push-ups are a smart beginner strength exercise for college students
Push-ups are a practical strength exercise for students because they train several muscles at once, require no membership, and fit into small spaces like a dorm room. A push-up works the chest, front shoulders, and triceps while the core, glutes, and thighs help keep the body in a straight line. That makes it a useful upper-body move and a simple way to practice full-body tension.
Body alignment matters because a push-up is not just a chest exercise. If the hips drop or the shoulders drift out of control, the movement becomes harder on the wrists, shoulders, and lower back. Good alignment turns the exercise into a stable plank that moves as one unit. The National Institutes of Health and other health authorities emphasize that strength training is most effective when major muscle groups are challenged consistently over time, not when workouts are complicated.
For college students, the appeal is practical as much as physical. You can do a few sets before class, after a shower, or between study blocks. That matters because regular exposure to the movement helps your body learn the pattern and build the control needed for a stricter version later.
How to choose your starting level: wall, incline, knee, or eccentric-only
If you cannot do a standard push-up yet, the best starting point is the easiest variation you can perform with clean technique. The goal is not to prove toughness. The goal is to find a version where you can move through a full range of motion without losing your plank position.
Wall push-ups are the easiest option. Stand arm’s length from a wall, place your hands at chest height, and lower yourself toward the wall. This is useful if you are brand new, deconditioned, or coming back after a long break.
Incline push-ups are the next step. Use a sturdy desk, countertop, bed frame, or other stable elevated surface. The higher the surface, the easier the push-up. Lower surfaces are harder because they increase the amount of body weight you have to move. That mechanical change is the main way you progress without adding equipment.
Knee push-ups can help some beginners practice the pressing path on the floor, but they are not always the best first choice if they cause hip collapse or shoulder strain. Eccentric-only reps are another useful option: start at the top of a full push-up position, lower slowly to the floor, then reset from the top. This can build control even before you can press all the way back up.
Choose the version that lets you keep control from start to finish. If your body line breaks down, the variation is too hard right now.
The progression ladder: how to move from one variation to the next
The cleanest push-up progression for a beginner is to reduce the incline over time. That changes the load by changing your body angle, so you can make the exercise harder without needing weights or machines. A wall push-up becomes an incline push-up, then a lower incline, then the floor.
A simple ladder looks like this: wall push-up, high incline push-up, lower incline push-up, knee push-up or eccentric-only floor reps, and then standard floor push-up. You do not need to rush through every rung. Many students stay at one level for several weeks while they build consistency.
The readiness rule is straightforward: move up only after you can complete 10 to 12 controlled reps with a 3-second lowering phase and no major form breakdown. That means your chest lowers smoothly, your trunk stays firm, and your hips do not dip or pike. When those reps start to feel manageable, the next step is to make the surface lower, not to chase a huge rep count.
This is where beginner training differs from advanced training. Public health and exercise guidance from the CDC, WHO, and the American College of Sports Medicine supports regular muscle-strengthening work at least 2 days per week, but beginners do not need long, exhausting workouts. Even 1 to 3 hard sets can drive progress if the sets are done with focus and enough effort.
Form cues that matter most: wrist position, elbow angle, core brace, and hip alignment
Good form keeps the movement productive and lowers the chance that one weak link will take over. Start with your hands roughly under or slightly wider than your shoulders. If your wrists feel strained, place your hands on parallettes, dumbbells, or another stable elevated grip so your wrist stays in a more neutral position.
As you lower, keep your elbows from flaring straight out to the sides. A moderate angle, roughly 30 to 45 degrees from the torso, is usually more comfortable for beginners than a wide, winged position. Your chest should move toward the surface as a single unit with your trunk, not as a loose arching motion.
Brace your core and glutes before each rep, as if you are preparing for someone to tap your stomach. That cue helps prevent lumbar sagging. If your lower back dips, reduce the difficulty and re-establish the plank. The hips should stay in line with the shoulders and heels, whether you are on a wall, incline, knees, or toes.
Lower with control and press without bouncing. A slow eccentric phase helps you learn the groove of the movement and gives your muscles a stronger training stimulus. For beginners, consistency of position matters more than squeezing out extra reps with sloppy form.
A simple weekly schedule for busy students using 2 short sessions per week
A good beginner schedule is simple enough to survive exams, labs, and late nights. Aim for two short sessions each week on nonconsecutive days, such as Monday and Thursday or Tuesday and Saturday. That spacing gives your muscles time to recover while still giving you enough practice to improve.
Each session can be brief. Start with a warm-up set or two at an easy level, then do 1 to 3 working sets of your current progression. Stop each set when you are close to fatigue but still able to hold form. If your best set is only five clean reps, that is still useful. The goal is to build quality, not to force a certain number.
Habit stacking makes the routine easier to remember in a college schedule. Do a short push-up block before your first coffee, right after brushing your teeth, or after shutting your laptop when you finish a study session. Linking training to a predictable event removes the need to decide when to exercise each day.
If your schedule is chaotic, keep one backup option that takes only a few minutes. A handful of incline reps is better than skipping the whole week. Regular practice matters more than a perfect plan that never happens.
How to adapt for wrist discomfort, long levers, or low starting strength
Not all beginners start from the same place. Some students have longer arms, which create a longer lever and make push-ups feel harder. Others simply have less baseline upper-body strength because they have not trained the chest, shoulders, and triceps much before. Those differences are normal, and they are a reason to individualize progression rather than compare timelines.
If your wrists hurt, raise the surface or use a neutral grip. Parallettes, dumbbells, or the edge of a stable bench can reduce wrist extension and make the movement more tolerable. If the discomfort is sharp, persistent, or getting worse, stop and get medical guidance instead of trying to push through it.
If your lower-body leverage makes floor push-ups feel impossible, stay with an incline longer. A student with longer arms may need a lower body angle or more weeks at the same level before the standard version feels realistic. That is not failure; it is simply how the mechanics work.
For very low starting strength, begin with wall push-ups or a high incline and keep the sets short. Even one or two controlled sets performed consistently can create momentum. The point is to build a foundation you can repeat, not to force a fast timeline.
Common beginner mistakes that slow progress or increase strain
One common mistake is jumping to a harder variation before the body is ready. If you cannot keep your hips steady or you need to rush the lowering phase, the step is too large. Progress is smoother when the transition from one level to the next is small enough to control.
Another mistake is letting the lower back sag. That usually means the core and glutes are not braced enough, or the variation is too difficult. Fix the brace first, then decide whether you need a higher surface.
Wide elbow flare is another frequent issue. It can make the movement feel unstable and may irritate the shoulders. Keep the elbows at a moderate angle and let the chest move between the hands rather than trying to collapse straight down.
Racing the reps is also a problem. Fast, sloppy push-ups can hide weakness and reduce the training effect. Use the 3-second lowering standard as your checkpoint. If you cannot maintain control, the set should end even if your muscles still feel fresh enough to keep going.
Finally, do not treat soreness or a big rep count as the only signs of progress. Better alignment, smoother tempo, less wrist discomfort, and a lower incline are all real signs that you are advancing.
How push-ups can fit into a minimalist full-body routine with squats, lunges, and rows
Push-ups fit best as one part of a simple full-body routine, not as the whole routine. A balanced beginner plan can include a push pattern, a squat or lunge pattern, and a pull pattern. That means push-ups plus bodyweight squats, split squats or lunges, and some form of row.
In a dorm room, that might look like a few sets of incline push-ups, air squats, reverse lunges, and desk rows or band rows if you have access to a secure setup or a resistance band. The exact exercises matter less than covering the main movement patterns.
For college students, the benefit of this minimalist approach is efficiency. You do not need a long workout or a full gym setup to train the major muscle groups. Two short sessions per week can support a realistic routine when you repeat the basics consistently and progress one variable at a time.
As your push-ups improve, keep the rest of the routine simple. If your goal is to reach your first floor push-up, do not bury that goal under a complicated program. Build the habit, lower the incline over time, and let your body earn the next step.
Frequently Asked Questions
How many push-up practice days per week are enough for a beginner?
For most beginners, two practice days per week is a solid target, and that matches general muscle-strengthening guidance for adults. Short sessions can work well if you stay consistent and give yourself recovery time between them. If your schedule is hectic, even one or two focused sessions is better than none.
Which push-up variation should I start with if I cannot do one floor push-up yet?
Start with the easiest version you can control with good alignment. That may be a wall push-up or a high incline push-up using a sturdy desk or counter. If those feel too easy, lower the surface. If they feel too hard, keep the surface higher and build from there.
How do I know when I am ready to move to the next push-up progression level?
A useful readiness rule is to wait until you can do 10 to 12 controlled reps with a slow 3-second lowering phase and no major form breakdown. If your hips sag, elbows flare badly, or you have to rush the reps, stay at the current level a little longer.
What is the best push-up form for protecting my wrists, shoulders, and lower back?
Keep your wrists under or slightly outside your shoulders, keep the elbows at a moderate angle, and brace your core and glutes so the body stays in a straight line. If your wrists hurt, use an incline, dumbbells, or parallettes to reduce strain on the joint.
Can I build upper-body strength with push-ups without a gym or equipment?
Yes. Push-ups are a bodyweight pressing exercise that can build chest, shoulder, and triceps strength without a gym. You can also make them harder simply by lowering the surface over time, which is why they are such a practical beginner option for dorm-room training.
The Bottom Line
A smart push-up progression starts with the easiest version you can control, not with the version you think you should be able to do. For many college students, that means using a wall or incline first, then lowering the surface as strength and control improve.
Use a simple readiness rule: 10 to 12 controlled reps with a 3-second lowering phase before you advance. Keep two short sessions per week, brace your core, protect your wrists if needed, and stay patient with your own timeline.
If you pair push-ups with squats, lunges, and rows, you can build a low-cost, realistic beginner routine that fits dorm life and an unpredictable schedule.
Medical disclaimer
Medical disclaimer: This content is for educational and informational purposes only and is not a substitute for professional medical advice, diagnosis, or treatment. Dietary needs and supplement suitability vary by individual.
